This the first guest blog post, find out more about the guest blogger program here.
This post is by Steven Kang who blogs at ssbkang.com, where you can find his back catalogue of posts.
Introduction
VMware vCenter Orchestrator (hereafter vCO) was deployed a few weeks back and it’s been decided to deploy PowerShell plug-in for advanced automation workflows. Due to the lack of documentation, it wasn’t straightforward installing & configuring PowerShell host. In this post, I would like to share my experience with you.
For those of you who’s not familiar with vCO, the following documentations would be helpful. Also, attaching PowerShell plug-in documentation.
- Orchestrator Document
- Orchestrator PowerShell Release Notes 1.04
- Orchestrator PowerShell Plugin Document
Pre-requisite
Before starting, there are some pre-requisites to prepare:
- PowerShell Host
- Used Windows 2008 R2
- PowerShell plug-in for vCO
- IIS
- Local admin access
Installing PowerShell Plug-in
This is quite straightforward, please refer to this documentation. Basically, it’s to download and upload a file.
Configuring PowerShell Host
PowerShell plug-in uses Windows Remote Management to connect to the PowerShell host. For it’s authentication, there are 2 methods:
- Basic Authentication
- Kerberos Authentication
As there was no Key Distribution Center available i.e. Kerberos cannot be used for the authentication, I will be going through basic authentication with HTTPS.
1. Create self-signed certificate
The documentation suggests using makecert. However, it wasn’t easy enough to install Windows SDK and it’s dependencies. Alternatively, I used IIS to generate a self-signed certificate.
- Run IIS Manager
- Go to Server Certificates
- Click Create Self-Signed Certificate on the right hand corner
- Put the friendly name in, FQDN of the PowerShell host

Once the self-signed certificate is created, it’s required to check the right certificate is added in certificate store.
- Go to Run and type mmc
- Add Snapin and select Certificates
- Under Certificates, expand Personal -> certificates and ensure the self-signed certificate created is listed here
- Also, expand and check Certificates -> Trusted Root Certification Authorities -> certificates
Now it’s good to go and configure WinRM connection.
2. Configure WinRM connection, HTTPS
As discussed in the introduction, basic authentication will be used. There are two ways, either HTTP or HTTPS. To ensure a secure connection, I will be going through HTTPS (this is also the reason why the certificate was generated previously).
- Open Command Prompt as the administrator
- Run: winrm create winrm/config/Listener?Address=*+Transport=HTTPS @{Hostname=”host_name”;CertificateThumbprint=”certificate_thumbprint”}
- host_name is the friendly name you’ve put in while creating the certificate
certificate_thumbprint detail could be found on mmc. Double click the self-signed certificate and look for Thumbprint under Details tab
- host_name is the friendly name you’ve put in while creating the certificate
- Run the following command to confirm winrm is configured properly: winrs -r:https://hostname:5986 -u:administrator -p:password hostname
- After this, ensure port 5986 is opened on the Windows firewall. This is the default port for WinRM HTTPS connection.
3. Import SSL certificate to vCO
Before adding a PowerShell host, it’s required to import the SSL certificate to vCO.
- Log-in to https://vco_server:8283
- Navigate to Network -> SSL Trust Manager
- Under Import From URL: https://powershell_host:5986
To remind you again, 5986 is the default port for WinRM HTTPS connection.
4. Enable Basic Authentication on the Group Policy
After step 3, I tried to run Add a PowerShell Host workflow in the vCO client and faced the following issue:
Unauthorized access. Authentication mechanism requested by the client may not be supported by the server. (Dynamic Script Module name: addPowerShellHost#16).
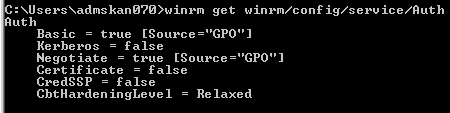
Running winrm get winrm/config/service/Auth, found out that Basic authentication was disabled and this is by default.
Enabled it by winrm set winrm/config/service/Auth @{Basic=“True”}. However, even the Basic authentication was active, I was still suffering from the error message above.
After Googling a bit, one guy suggested to edit Group Policy.
- Run Group Policy Edit, gpedit.msc
- Navigate to Computer Configuration -> Administrative Templates -> Windows Components -> Windows Remote Management (WinRM)
- For both Client and Service, Enable Basic Authentication
Once it was enabled in the Group Policy, I was able to add a PowerShell host.
5. Add a PowerShell Host
Adding a PowerShell host could be done via running the workflow.
- Log-in to VMware vCenter Orchestrator Client
- Under Design -> Library -> PowerShell -> Configuration -> Add a PowerShell host


Future Work
For the next blog post, I will be going through how to import your PowerCLI script into vCO.
Hope this was helpful.
Excellent tutorial, thanks
I see below error and itseems to be not working, I am trying to configure https on the IAAS server.
WSManFault
Message
ProviderFault
WSManFault
Message = The WS-Management service cannot process the request.
The value for the selector Address is invalid.
Error number: -2144108451 0x8033805D
The WS-Management service cannot process the request because a value for the sel
ector is invalid.